This is a Hitskin.com skin preview
Install the skin • Return to the skin page
 Публикации
Mīkstā rotaļļieta - "How to.."
2 posters
Leļļuplaukts :: SADAĻAS PA LEĻĻU VEIDIEM / РАЗДЕЛЫ ПО ВИДАМ КУКОЛ :: PAREJIE LEĻĻU IZLAIDUMI / ОСТАЛЬНЫЕ ВЫПУСКИ КУКОЛ :: Mīkstās rotaļlietas / Мягкая игрушка
Lapa 1 no 1

Mīkstā rotaļļieta - "How to.."
![]() by Гость 20.03.11 11:52
by Гость 20.03.11 11:52
Mans jaunais atradums lapiņa:
http://rainbowrokdarbi.blogspot.com
Zeķu zilonis
Kā jau solīju - zeķu zilonis! Man jau pašai liekas - re, kā es pati izdomāju, kā tikt pie ziloņa! Bet gan jau daudzas rokdarbnieces taisa arī tieši tā.
Bet tomēr - ņemam divas zeķītes un griežam šādi:

 Man, protams daudz, kas paliek pāri, rokas tomēr nogriezu drusku īsākas.
Sašujam un sapildām galvu un rumpīti, piešujam ausis (nav sapildītas ar sinteponu):

...piešujam rokas un acis (tas man liekas visaizraujošākais process, jo ar meitu pārcilājam visas pogas kastītē)

Un zeķu zilonis gatavs!
http://rainbowrokdarbi.blogspot.com
Zeķu zilonis
Kā jau solīju - zeķu zilonis! Man jau pašai liekas - re, kā es pati izdomāju, kā tikt pie ziloņa! Bet gan jau daudzas rokdarbnieces taisa arī tieši tā.
Bet tomēr - ņemam divas zeķītes un griežam šādi:


Sašujam un sapildām galvu un rumpīti, piešujam ausis (nav sapildītas ar sinteponu):

...piešujam rokas un acis (tas man liekas visaizraujošākais process, jo ar meitu pārcilājam visas pogas kastītē)

Un zeķu zilonis gatavs!

Гость- Viesis

einite- Foruma dvēsele

- Сообщения : 5412
Дата регистрации : 07.03.11
Откуда : Рига
Re: Mīkstā rotaļļieta - "How to.."
![]() by Enifer 26.11.11 22:33
by Enifer 26.11.11 22:33
http://fordoll.diary.ru/p169737186.htm
Well we are all done... I hope you enjoyed, Hugs, Sharon
- Spoiler:
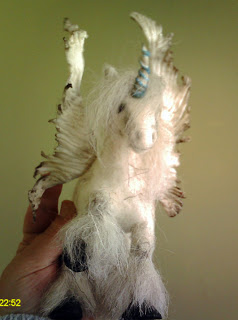
Не знаю, нужен или нет, но очень уж красивый (фотка не моя). При моей распечатке для тини бжд просто огромный(, а вот барби шарнирная хорошо сидит. Из фетра с проволокой, обмотанной лейкопластырем, чтобы не ерзала. Крыльев нет, я от Тильды брала. Если у кого-то есть красивые крылья, поделитесь, пожалуйста.


читать дальше

Обновление:
Вот еще ссылки дали на него, урок по единорогу, с крыльями. Но все равно другие крылья хочется, чтобы не лепить
shawkes@xtra.co.nz or visit my site at www.houseofpugish.comWell guys here is lesson 1 ...thanks for being patent ))... I got a cheap camera and well what can I say ... you get what you pay for...so excuse the pictures some are a little blurry so I will do my best to explain them as we go!
So here I've traced out my pattern pieces onto some calico (muslin for you guys in the US) and I've taken some really cheap white glue and run a line over the pencil lines... smear this in so you don't have any lumps when it dries... I've done this as it stops the fraying of the material while your handling it and having seams pop open!
Next we cut out the pieces we will need which are the sides and the inner side pieces as below and sew them together only around the inside of the legs, tummy (not the back or front of the legs) using a small stitch on your sewing machine and a 1/4 seam... Use the edge of your sewing machine foot for a guide.
Sew both sides as above making sure not to sew those outer legs as yet!
Once you've done that we'll join both sides so place your 2 pieces like I have here and fold the neck and body down away from the curved line of the half body piece and pin together as I have in the next shot.
Sew along this curve... again a small stitch setting with a 1/4 seam.
Here's what we should have at this point))
Next we'll sew up the outer sides of the legs....just to the point of the inserts points on his rear end. The front is the same but when you sew the second leg closed you will pass the point of the insert and sew to the top of the neck opening... leave the neck open where the head will sit in that curve!
Rump insert... This is one of those places I'll hand sew ... it easier to do so for me... If you'd prefer to machine sew and are confident of doing so then you can do that... I just hate having to unpick and I find I will 99% of the time have to end up doing so ...so I hand sew LOL
Right back to the rump insert... place the fatter point of the leaf shape toward the point of the body insert and tack in place with a stitch... continue to tack this piece in place up both sides till you get to the front point... tack both sides to this point... you could use pins if you want but I like to tack with a stitches... once you have it tacked in place hand stitch together properly with a blanket stitch then a straight stitch ...yes sew it twice as extra strength is always a good thing!
Sew top of neck closed at this point too leaving the curved part at the front open!

Right the Head.... it's pretty easy ... even though some will say Gusset Yuck LOL
Take one half of the head and starting just under the chin bump at A sew the insert gusset from this point around head to B and you should finish just before where you started ...
The other side of the head is done in just the same manner only this time leave a bit open as indictaed in the next picture for turning.
Right so after all that your almost ready to turn your pieces... but before we do that just whip stitch the bottom of the hooves closed to make turning the legs just a tiny bit easier... okay turning can be tricky and the smaller your doing your horse the trickier it will be ...so have patience ... I have done this one smaller than my originals so I actually had to use a doll needle to help in turning them!!
Once turned stuff ...remember to stuff the legs firmly we do want his to stand!!...don't attach the head yet ...
Right that's all for today ... Next part will be up tomorrow...any questions email me))
Okay so here we are pt 2... lets start with where I should have finished last time ... in the next pictures you'll see the body stuffed and from the underside I wanted to make known that the splayed legs is normal don't worry about it as the will be pulled in as you add the needle felted wool!

Now for the hooves... grab yourself some polymer clay ...this is a good way to get rid of some dirty clay if you have any and roll 4 balls as I have in the next pic ...please note I've made sure the bottom of the legs are in view so you can gauge the size!
Next is the sculpting of the hooves...below is a couple of pictures of what we will be doing.
first is the top view and the second is the bottom view...

Okay lets get started... take one ball of clay and place it on a hard surface ...place finger as I have in pic below and push down flattening that side to about half the height it was... next pinch that flattened side as in the 3rd picture ...


Now we will start using a tool to work the clay... the tool I'm using is a size 8 knitting needle.
Using that tool place a dent in the back as in this picture...
Again I have to say sorry for the pictures ... I do miss our good camera!
Right now you'll use your knitting needle to slope the clay down to your work surface...as in pictures below...

This is an optional step... I like to add a little detail to the under hoof by adding in the wee frog and hollowing it out a bit like the real thing... if you don't want to do this just skip to the next stage of trimming...
Turn the hoof over so you'll be working on the flat under side... now using your knitting needle press a triangle into the clay at the pinched side... then using your thumbs push the clay out away from the triangle leaving the triangle raised... place a small line down the middle of that triangle and that's that done))

Now you'll lift the hoof of the hard surface and trim off the excess and making a nice round hoof... when you get to this stage with the next hooves take the already trimmed hoof and the one you want to trim and place flat sides together then simply trim to match the other hoof... remember to use your finger and smooth any rough or hard edges... don't push too hard with your fingers just gently rub!
Now we'll dig a hole in the top as I have with this pic... this will accommodate the cloth hoof of the body...
almost there now))
Okay here's something I don't think I put on the materials list ... Liquid polymer clay... if you don't have any a wee bit of baby oil will do just as well... this will be used to help the polymer clay stick to the cloth... so rub either the liquid clay or the baby oil on the cloth hoof... try not to go too high into the leg... pop the hoofs on and blend the top of the clay to the leg... once you have all the hooves on and have made sure the horse balances then pop the whole thing in the oven and bake the clay to the manufactures specification... when baked and cooled paint black or brown...


Okay next step will be tomorrow if all goes well))
In the mean time here's a link to my good friend Sharon NZ blog go over and have a look at her Unicorn she's doing along with me))
If you are doing one as well and sharing on your blog I would love to see and pop a like here))

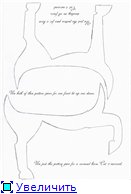
[center]Alrighty .... Here is an extract from my Charlie horse pattern booklet ... I feel so bad about those close up pics of the hoofs I decided to pop these 2 pages up ... the only difference with these instructions is I take the hooves off and bake them then glue them onto the feet afterwards and also I've not done the under hoof sculpting ... Least you can actually see what is in the pictures))
Righty lets get started on the 3rd lesson... this is going to be a long one and may raise a few questions so let me know if something isn't as clear for you to understand.
Firstly sew the neck opening closed this doesn't have to be all neat and tidy we just want to sew it flat.
Next we'll get some fiber on the head... now I always start by felting the wool onto the flat front of the head then down the sides ... do the under part last... this just helps to keep track of where all the curves are.


Legs next... here is were your going to have to have plenty of patience and work slowly and carefully as stabbing yourself with those needle are not pleasant! wrap a bit of wool around the leg felting one side down just enough to keep it down... fold the other end over and begin felting... keep felting the wool down until it becomes a nice skin...
Now if you have made your horses legs a bit thin then felt wool only to the knee level...we'll cover the bottoms of the legs in lesson 4

Next cover the whole body in wool or fiber ... I always start at the tummy and chest ...as you work you'll notice the legs will be pulled in so they aren't so splayed.
When you've covered the body fully you'll have something like this...

Now is time to attach the head... play around and pin in different positions until you find one you like... now thread your black beads onto some very strong thread about 8-10" length ... thread a doll needle with the ends of one set of eyes and push needle through eye position and through to the back of the neck as you'll see below I have... slip needle off and repeat for the second eye coming out again at the back of the neck but as close to the other thread as possible ..tie both threads together pulling tightly and knot a few times... re-thread the needle with both threads and loose ends within the body.

Lets get rid of that gap between the head and neck join as well as the indent made by the thread... take a chunk of wool and needle felt it over the gap and indent... if you haven't covered it properly then simple add a bit more))
Righty ears ...he certainly needs them ... and I'm sure you guys that haven't much experience in needle felting will find them challenging... but I will endeaver to explain them as simply as I can...
Start with 2 balls of wool roughly the same size... if you printed your horse to A4 size you'll need balls of wool around the size of small plums... if like me your doing your horse to around half the size then your balls of wool will need to be about Cherry size... now to get these sizes you need to take a piece of wool and scrunch it up in the palm of your hand and squeeze it... this is the way you judge the size that piece of wool will felt down to!
Okay so you've gotten your 2 balls of wool ready ..now just flatten it down and sort of shape it with your fingers to a triangle shape...
Now take the triangle between your thumb and forefinger with the flat edge between fingers..
Felt that edge from top to bottom then turn over and do the opposite edge... keep doing this until it's 1/3rd the size.... felt across the bottom but not too much ... just to neaten it up a wee bit... when your felting the sides do not felt the top of the triangle we want to keep the point)) ... when done you should have something that looks like this here... make another one...
To attach to the head pin in place and make sure you have them even and in the right place... when you begin to needle felt start at the front center and then the right and left sides... then felt around the entire bottom until attached firmly and felted to the size you like...

Now lastly for this lesson we'll tidy up some of those very annoying fluffy bits sticking out all over the place... there are 2 ways to do this ...1stly you can take a pair of small scissors like manacure ones and clip them off as closely as you can ..or if you have a heat gun simple give an overall blast with the heatgun until those hairs shrink and disapear... if you do use the heatgun I must warn you to keep the heatgun moving at all times and dont hold it too closely as burned wool doesn't look nice ...at least not on this guy))
Here's how he looks after his blast with the heatgun...

Much tidier eh))
Okay thats it for this lesson next one will be the finishing one... we'll be doing the long hair on the legs, mane, tail, horn and optional wings!
Right lets get to finishing this guy...
Firstly we are going to add the long hair over the hooves and lower legs... so take a length of the fiber your using and measuring from about the knee down to the bottom of the hoof cut that from the length of fiber... do the same for each leg ...
Next using a good tacky glue brush some on the top of one of your cut pieces..
Now wrap this around the knee area... yep this is a messy job so do your best...
Do this for each of the legs but only the front of the leg that's bent...

Okay that done allow to semi dry... now before it's fully dry usually about 2-3min ..start to felt the top in where the glue is ... use you needle at the same angle I have here... this will help aid in avoiding your fingers... also remember to go in straight so you don't break your needles!
Once you have done that to all 4 of the legs we'll trim them a bit... note the direction of the scissors... if you trim off the bottom then when your feathering the hair always cut down the hair using just the tip of your scissors... remember to snip little by little we dont want to take chunks out just sort of layer it a bit... now if your happy with the layering stop there... if your not happy with the layering as its a bit thick on the bottom ...that is easy to correct by taking you scissors and snipping upward to thin it out a little... idealistically I aim for just a hint of hoof being visible through the hair... but again this is up to your taste))
Pic of all legs trimmed...
Okay... lets get to the mane etc...
But first lets highlight some bone areas... best way to describe it to you is have a look at the pictures... I've used a black pencil quite strongly here so you could see it clearly ...but you would do yours a bit lighter ...just a hint... so follow what I've done ...

Holding your piece of fiber in one hand pull a chunk of hair from the top... you don't need to much here just a small longish bit for his fringe...
Felt this piece between the ears..

Mane now... using the techniques as above pull out a couple of lengths of fiber and spread it out as I've done here... please note you dont need a thick amount as it will be folded...
now if your making a big Unicorn then hold your fiber lengths up to your horse to see if you like the length.... if you do then choose what side you would like the mane to fall and felt the ends down on the opposite side... fold over and finish as for the folded mane...
Place this over the neck like here and felt it up the center very well...

Now play around by folding it over on each side to decide which side you like ...once you've decided which side you like hold it in place but don't pull ..you want it to be a bit puffy and not flat...have a look at the pic to see what I mean...
Next well attach it down just gently to keep it sitting on the side... note were my needle is in the next picture then just gently felt across the neck... only a few stabs with the needle as we don't want to flatten it or have a line there...
Tail... I've pulled out a length of fiber ... then I've folded the top down just a bit and stabbed the needle around to hold it in place... I did this as the top of the tail needs a bit more thickness to it...
Attach the tail by needle felting around the ball you made at the top of the tail...
Okay as you can see in the above picture his tail is just not long enough... so I pulled another piece of fiber, lifted his tail and felted it in just a bit lower down... now yes I know this isn't a pretty picture but it needed doing!
Looking much better now))


Right that's the horse part done... now lets turn him into something a bit more mystical)) ... With the length of this post I will put it up on another post ... and you wont have to wait long as I'm going to do that right now!
Well we are nearly there guys... this is the last part ...so post links to me if you want to show off your Unicorn!
Here's a pink one in the processes of being created... it's gonna look fantastic)) visit Sharon to see how she's going!
Lets get going... I'm going to start with the wings ... so here's a pic of what you'll need... please note I am using cernit but that's not a requirement ...you any polymer they will all turn out the same))
next I've rolled out about half of the pkt of clay ... probably about 1-2mm thick..then I've cut 2 pieces of wire and folded them in half and twisted it folded side till it's about an inch long... then I cut the wire to the length I wanted by holding up to the side of my wee horse..
here's a pic of one piece of wire cut on top of the white rolled out clay...
once you've cut both the wing wire to match lay them on the clay making sure the twisted end is hanging over the edge of the clay... this this then end we will insert into the horse so needs to be as clay free as you can get it!... trim the clay so it's about 1/2cm away from the outer edge of the wire ... rub a little baby oil or liquid clay over the wire and overlap of clay... then fold that clay edge over the wire and press it down so that it's well attached to the clay... then slice down the middle of the wings .. like below...
Next give the wing some shape by cutting it like this...remember to make sure you have a pair ...we don;t want to have 2 lefts or rights!
Right with your knitting needle begin to press and drag it through the clay from the wire to the cut edge... press harder as you get toward the cut edge so that your tool goes through the clay all the way to the plate...my plate you can see in the picture is a tile I use for making then baking on.
Now after you've done that you should have something that looks a bit like mine here...
Once you have both wings done lift them off your surface as gently as you can ...we don;t want to rip them or pull the wire out...once you have lifted bend the wire into the pose you want ...then repeat on the other...they don't have to be exact so don;t try else you'll be at it all day and frankly I really love that mine don't match...makes for a more interesting piece!
Righty then place them on some fiber fill ready to be baked soon as we've done the horn...
For the horn all we do if take a small length of wire and twist it to the top ...this only needs to be about an inch at the most so don't twist a huge length!... roll out a bit of clay to look a bit like a carrot then insert the wire into the carrot... now to finish it off I rolled out a very skinny piece of clay then wrapped it around sort of like a spiral ...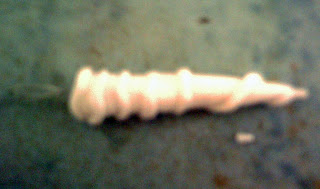
Next pop everything in the oven and bake as the direction tell you on the packet...
Okay when cooked and cooled it's time to decorate as you'd like... for me I brushed some glue over just the spirals of the horn and sprinkled with glitter... then because I'm a bit of a fire bug I lit a candle and just gently burned it just enough to take the brilliant white and cut down on the sparkle of the glitter... now I chose to do this as my wee guy has a lot of gray in him and the white was just too white ...for the wings I just burned them again just gently to take away the "white"!
For attachment use a needle tool or a doll needle and poke it into the place were the wing will be attached... wriggle it around and make sure it's wide enough to insert that wire on the wing... if the wire is too long trim it off so it's shorter but not too short as we want it to be firmly in there... when your happy with that use a drop or 2 of superglue on the end of the wire and also the bit of clay at the top of the wire... re-insert and hold till it's taken... then bend the wire to the angle you like... please don't try and bend the wings themselves else they will break!... repeat for the other wing and also for the horn...when your done you should have something like mine here))


Well we are all done... I hope you enjoyed, Hugs, Sharon
Pēdējo reizi labojis Enifer 20.03.12 11:59; labots 1 reizi

Enifer- Foruma dvēsele
- Сообщения : 6795
Дата регистрации : 05.03.11
Откуда : Latvia, Norway -

Re: Mīkstā rotaļļieta - "How to.."
![]() by Enifer 27.11.11 3:54
by Enifer 27.11.11 3:54
http://www.supersadovnik.ru/masterclass.aspx?id=348
Комод-игрушка. Мастер-класс
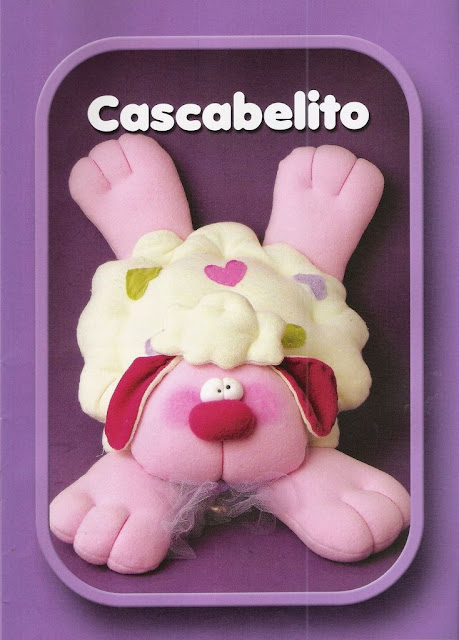
Дизайнер: Виолетта БелецкаяПорой трудно расставаться с вещами, которые прослужили нам верой и правдой много лет. Да и незачем, ведь есть способы для их "омоложения"!

1 Обработайте поверхность комода из фанеры наждачной бумагой средней зернистости и покройте акриловым грунтом, разведенным небольшим количеством воды. Оставьте грунт сохнуть. Возьмите акриловую краску цвета слоновой кости и поролоновым валиком покройте комод одним-двумя слоями краски.

2 Из клетчатой ткани выкройте детали, чтобы получились штанишки для медведя. Наклейте ткань на передние стенки ящиков комода, используя клей ПВА.

3 Приклейте бархатную тесьму, подходящую по цвету. Также приклейте декоративный ремень, используя клей "Супермомент".

4 Возьмите мягкую игрушку и аккуратно отпорите нижние лапы, хвост и голову вместе с верхними лапами, лишнюю ткань срежьте. Ниткой с иголкой зашейте отверстия каждой детали, чтобы синтепон не высыпался. Состригите мех на деталях в местах приклеивания к комоду.

5 С помощью горячего клея приклейте детали к комоду: нижние лапы к нижнему ящику комода, хвост – к задней стенке, а голову с передними лапами – на крышку.

6 Ваша игрушка
Enifer- Foruma dvēsele
- Сообщения : 6795
Дата регистрации : 05.03.11
Откуда : Latvia, Norway -
Re: Mīkstā rotaļļieta - "How to.."
![]() by Enifer 27.11.11 3:55
by Enifer 27.11.11 3:55
tyt mnogo interesnogo: http://www.supersadovnik.ru/digest/kids/
Enifer- Foruma dvēsele
- Сообщения : 6795
Дата регистрации : 05.03.11
Откуда : Latvia, Norway -
Re: Mīkstā rotaļļieta - "How to.."
![]() by Enifer 20.03.12 9:59
by Enifer 20.03.12 9:59
- Spoiler:
- Когда-то я услышала интересную теорию о том, что у каждой куклы должна быть история.
Самое простое - это сделать какую-нибудь игрушку.
А может быть, и не для куклы. Просто так. Для себя.
мы исходим из того, что у нас есть нужная шерсть и иголки.
собственно, это все, что нам надо.
берем два кусочка шерсти и формируем примерные голову и тело.
надо понимать, что в процессе валяния, шерсть дает усадку примерно в два раза:
сильно уваливать не надо, не надо, чтобы идеально было... это все потом)
сейчас важно создать форму:
формируем ушки, складывая тоненькие кусочки шерсти пополам:
оставляя хвостики, которые потом мы приваляем к голове:
по принципу ушек формируем лапки:
я немного подкручиваю пальцами, чтобы удобно было валять потом:
в результате всего получаем вот такую модель для сборки:
приваливаем лапки и ушки:
собственно все)
дальше
остается только разровнять дырочки часто-часто такая иголкой, потом
надо пройтись обратной иглой (она вытаскивает шерсть и делает
поверхность лохматой), а потом снова немного иголкой.
пришиваем голову к телу, делаем мордочку.

Enifer- Foruma dvēsele
- Сообщения : 6795
Дата регистрации : 05.03.11
Откуда : Latvia, Norway -
Re: Mīkstā rotaļļieta - "How to.."
![]() by Enifer 20.03.12 12:00
by Enifer 20.03.12 12:00
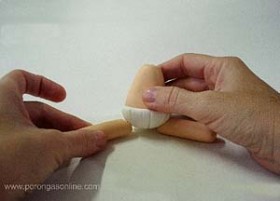
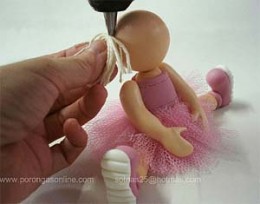
Куколка из пластики. ЛЕПКА
Чтобы слепить такую куколку понадобится пластика и маленькие пенопластовые шарики.

Чтобы слепить такую куколку понадобится пластика и маленькие пенопластовые шарики.
- Spoiler:


Enifer- Foruma dvēsele
- Сообщения : 6795
Дата регистрации : 05.03.11
Откуда : Latvia, Norway -
.jpg)


.jpg)
Enifer- Foruma dvēsele
- Сообщения : 6795
Дата регистрации : 05.03.11
Откуда : Latvia, Norway -
Re: Mīkstā rotaļļieta - "How to.."
![]() by Enifer 20.03.12 12:05
by Enifer 20.03.12 12:05
Мастер-класс «Ёжик»

"Добрый день. Сегодня я хотела показать, как я
делаю ёжика из войлока. Для этого мне понадобиться: Кардачёсанная
шерсть белого цвета (примерно -40 гр.) и серого цвета (примерно- 15гр)
Стеклянные глаза…"...
www.livemaster.ru/topic/91064-master-klass-ezhi...
"Добрый день. Сегодня я хотела показать, как я
делаю ёжика из войлока. Для этого мне понадобиться: Кардачёсанная
шерсть белого цвета (примерно -40 гр.) и серого цвета (примерно- 15гр)
Стеклянные глаза…"...
www.livemaster.ru/topic/91064-master-klass-ezhi...
Enifer- Foruma dvēsele
- Сообщения : 6795
Дата регистрации : 05.03.11
Откуда : Latvia, Norway -
Re: Mīkstā rotaļļieta - "How to.."
![]() by Гость 20.03.12 12:15
by Гость 20.03.12 12:15
http://www.diary.ru/~dizombie/p164167962.htm

- Spoiler:
- Наконец-то я сделала вторую куклу из моей анималистической серии (о
боже, только дошло, что это выходит фури Х_Х). Думаю назвать серию Dead
Forest.
Anyhow, я сделала небольшой туториал, поскольку меня попросили.
Вот оно, мое новое творение! "Оленёнок"
~23 см, La Doll
и первый из серии "Белый Кролик"
Bunny by *Deadistress on deviantART
Потребуется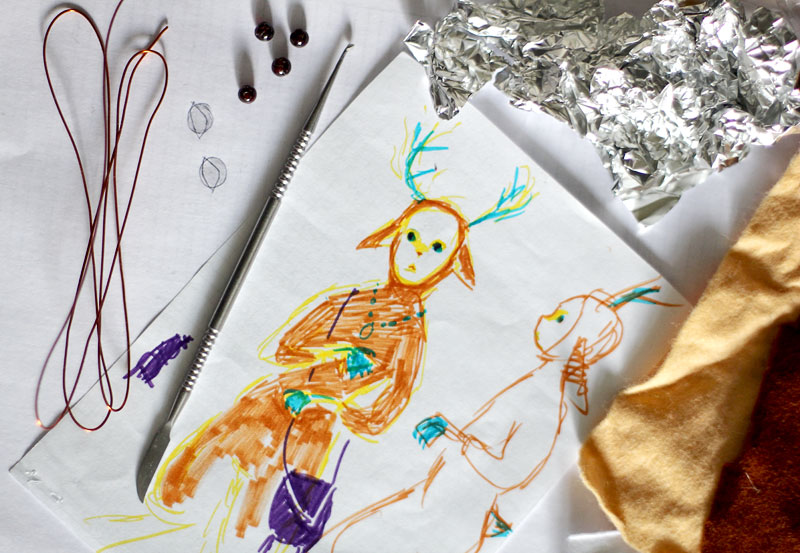
-самое главное - это эскиз! (я ориентировалась на эскиз и на предыдущую куклу)
-пластик, в моем случае это La Doll и косук фольги. Но вообще подойдет любой пластик, из запекаемых советую "Сонет".
-стеки
для лепки, можно купить специальные в кукольном магазине, а можно
использовать "зубные" инструменты - продаются на строй рынках.
-проволока для каркаса, любая, главное чтоб гнулась нормально
-глаза, у меня это бусины, но можно использовать стразы или сделать их самостоятельно
-ткань для тела
-синтипон для набивки
-всякая мелочь(бусины, шерсть, нитки)
Сначала
я скатала фольку и посадила её на проволоку - так вес головы меньше.
Затем я слепила лицо и вставила бусины, сверяясь с эскизом и предыдущей
куклой.

Теперь каркас. Тут я особо не буду расписывать, каждый делает, по своему эскизу.
ноги и хребет не должны быть очень тонкими - иначе кукла будет шататься как желе.
по поводу рук - они делаются по такому принципу:
ноги
делаются либо так же(как у кролика) либо как в данном случае - я
слепила копытца, внутри которых по тяжелому шурупу для устойчивости
Рога
- это проволочный каркас облепленный ладолом. Ладолл очень мягкий,
потому я с легкостью проткнула в нем дырки для рогов после его
затвердевания.
Далее все предельно просто - обматываем каркас синтипоном и обшиваем тканью. Я выбрала тонкий коричневый и ванильный войлок.
Выкроек не делала, просто вырезала на глаз одинаковые кусочки и аккуратно их пришивала невидимым швом.
К голове ткань я приклеила при помощи прозрачного момента.
В качестве пальцев я оставила торчащую проволоку, это похоже на когти, хотя, изначально я не собиралась этого делать.
А к копытцам я еще прикрепила "пятый палец" для устойчивости, получились такие каблучки =D


Гость- Viesis
Re: Mīkstā rotaļļieta - "How to.."
![]() by Гость 20.03.12 12:32
by Гость 20.03.12 12:32
Мастер-класс по изготовлению драконов от Риты

Источник
- Spoiler:
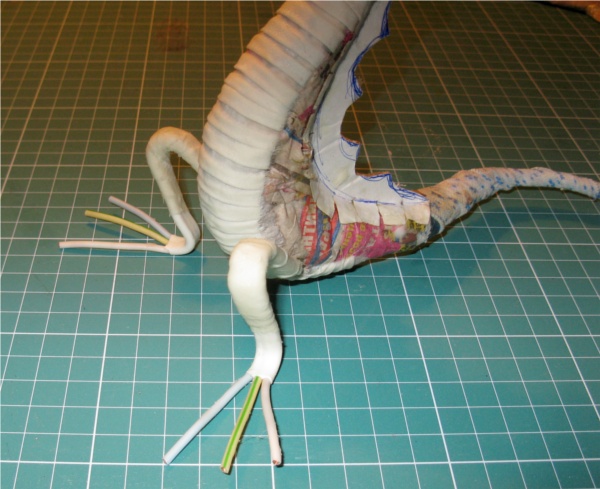
В этом мастер-классе мы попытаемся сделать вот таких забавных дракошек из папье-маше.
Прежде чем начать - включаем любимую музыку, забываем (на время ) обо
всех проблемах, заботах и делах и начинаем... медитировать.
Да-да,
именно медитировать, ведь любая ручная работа, выполняемая с
удовольствием, очень успокаивает, дает возможность отвлечься от суеты,
забот, проблем...
Ну и с чего же мы начнем?
А начнём мы с создания эскиза.
В этом нам может помочь уже готовая картинка, если будет создаваться уже придуманный кем-то образ.
Ну, а если это будет невиданный зверь, то тут было бы неплохо прорисовать все детали, их расположение и пропорции.
Хочу заметить, что в процессе работы может сложиться так, что образ
сам начнет диктовать те или иные уточнения к своему внешнему виду и в
итоге может
получиться не совсем то, что было задумано. Но если
образ уже хорошо сложен и отшлифован мысленно, что изменения в процессе
изготовления могут быть
совсем небольшими.

Итак - эскиз готов. По нему мы выкладываем проволочный каркас тела.
Нужно постараться поточнее передать все изгибы. От этого зависит
выразительность нашей работы.

На каркас нужно намотать слой газеты, смоченной в клее ПВА. Клей лучше
разбавить водой, - нам будет мешать, если он будет быстро
"схватываться".

Жгуты газеты должны плотно обхватывать проволоку. В местах утолщений - добавить еще слой.

На фото видно, что наложено несколько слоев - и один из них тканевый. Для удобства можно использовать и ветхую ткань.
Для того чтобы было удобно продолжать работу дальше, заготовку нужно подсушить.
Сделать это можно летом на солнце, зимой - на батарее, или в не очень горячей духовке (режим приготовления сухофруктов)
Заготовка тельца должна быть сделана с запасом объема - быть тоньше,
чем нужно - ведь сверху на нее будет наложен еще фактурный слой. Именно
для фактурного слоя мы и оставим запас объёма.
На подсушенную заготовку нужно нанести дополнения. В нашем случае это - зубчики на спине и складочки на животе.
Зубчики вырезаются из тонкого картона. А для складочек мною была использована плотная льняная ткань.
Ее тоже нужно смочить в клее и задрапировать. Всё оставляем сохнуть.
И приступаем к изготовлению крылышек, ножек и ручек.
Для них нам понадобится медная проволока. Для ножек удобнее брать
трехжильную - три пальчика на ножке получатся, если вы снимете часть
оплетки на конце проволочной заготовки.
Перепонки можно сделать - обклеив проволочные "пальчики" бумагой так, чтобы получилось что-то напоминающее ласты.
Для крыльев подойдет медная одножильная проволока.
Основным требованием к проволоке для крыльев и ножек - хорошая
жесткость и упругость, именно от этого зависит устойчивость фигурки и
прочность крыльев.

Каркас крыльев тоже делаем по эскизу, скрепляя кусочки проволоки ниткой, или тонкой проволокой.

На
готовый каркас приклеиваем кусочек гипюра. Клей должен быть густым, с
хорошей схватываемостью. Здесь я использую клей ПВА столярный.
Когда гипюр прочно приклеился - аккуратно отрезаем все лишнее. Можно для
прочности прошить по гипюру ниткой "в обхват" проволоки.
После этого покрываем все крылышки слоем ПВА. Всё сушим.
Приступаем к изготовлению ручек.

Для пальчиков нужна тонкая медная проволока, которая будет
обматываться полосками бумажных платочков.Полоски не нарезаем ножницами
- а разрываем вручную - рваный край будет менее заметен на тонких
детальках.
Наносить клей на бумажные ленты нужно очень аккуратно, и
лучше, если он будет во флаконе с тонким носиком - просто наливайте
клей тонкой нитью по всей бумажной ленте и сразу наматывайте на
проволоку, кистью при этом не пользуемся.
Еще хочу добавить

что сушить заготовки пальчиков лучше располагая их вертикально, воткнув по одному в подставку из куска пенопласта.
Изготовление пальчиков - самая кропотливая часть работы. Кому
сложновато - можно сделать ручку без пальчиков - просто вылепить из
бумажной массы ручку упрощенной формы.

Ну,
а кто захочет потрудиться - оно того стоит, согласитесь, - такие ручки
очень украсят работу, придадут ей особую выразительность...
Ручки выполнены в упрощенной технике Наташи Лопусовой-Томской.
Обклеенные высохшие заготовки пальчиков собираются в кисть и
скрепляются между собой такими же полосками бумаги, их каких делали
обмотку для пальчиков.
Дальше приступаем к изготовлению головы

Для головки вырежем заготовку из строительного утеплителя ... Материал очень податливый, работать с ним легко.

Вот такая деталька получилась у меня. Здесь нужно не забывать, что вырезать ее нужно с учетом того,
что на нее будут накладываться бумажные слои и размер ее в процессе
работы увеличится. Значит, вырезая, учитываем и тут запас объёма для
последующих слоев.

Обкливаем заготовку слоем газеты. А верхним слоем будет - фактурный.
Фактурный слой - бумажная масса, смоченная клеем ПВА. Я для удобства раскатываю ее скалкой, поместив в целлофановый пакет.
В таком виде ее можно хранить несколько дней, пока не используете всю.

Аккуратно извлекаем массу из пленки и наносим на заготовку. Это помогает нам равномерно покрыть всю фигурку фактурным слоем.
Накладывать его нужно аккуратно, уплотняя сухой щетинной кистью, стараясь сохранить все неровности, не сглаживать их.

Вот в итоге что у нас должно получиться.

Соединение деталей дело несложное. Шилом делаем отверстия в нужном
месте, капаем в отверстие густого клея и вставляем в них детали ручек и
ножек. А для прочности - заполняем пустоты в отверстии папье-машовой
массой.
После высыхания все будет достаточно крепко.
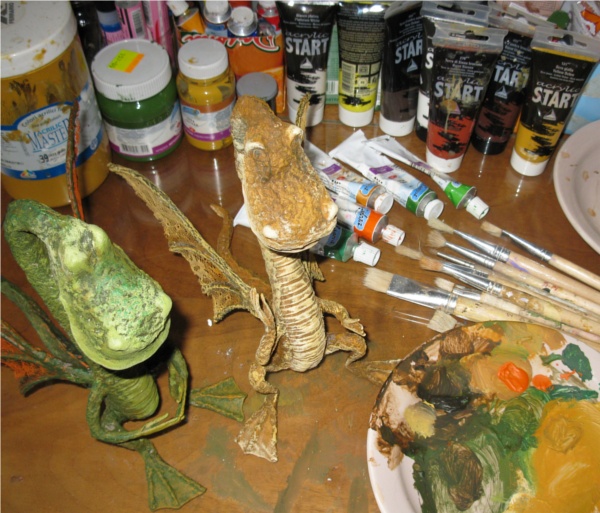
И далее начинается самое ответственное - окраска фигурки.
Тут уж вам потребуется вся ваша фантазия и воображение. Вариантов окраски может быть огромное количество!
Но самое главное - подчеркнуть фактуру поверхности поделки. Для этого используется такой прием, как многослойная окраска.
Нижние слои будут темнее, верхние - светлее.
При этом верхние слои наносятся по "верхам", не перекрывая полностью
нижние, чтобы нижние слои краски были видны в углублениях нашего
фактурного слоя.
Это придаст выразительности, подчеркнет рельефность поверхности.
Слоев краски обычно бывает 3-4.
И для еще большей выразительности добавим реснички и хохолок.


Вот и всё готово!
Сверху на фигурки нужно нанести защитный слой (мы же ведь помним, что
все это - всего лишь бумага). Защитит бумагу от влаги лак, или воск.
Лак можно использовать любой бытовой для покрытия полов. Воск же мне
нравится больше - работа, покрытая воском, очень приятна на ощупь и не
имеет сильного блеска.
Для покрытия фигурок воском используйте
восковую мастику для полов. После нанесения ей нужно дать подсохнуть и
растереть мягкой тканью.
Желаю вам успехов и радости творчества!!!
Источник
Гость- Viesis
Re: Mīkstā rotaļļieta - "How to.."
![]() by Гость 20.03.12 12:41
by Гость 20.03.12 12:41
Сказка "Репка" + выкройка
http://www.livemaster.ru/topic/93059-skazka-repka-vykrojka?

http://www.livemaster.ru/topic/93059-skazka-repka-vykrojka?
- Spoiler:


В общем, представляю вам выкройку кукол и краткое описание работы для создания сказки «Репка».
Вам понадобятся:
1. Ткань (хлопок бежевого цвета для тела, цветную для одежки,
преимущественно с мелким рисунком и для животных - я использую лен)
2 Пряжа для волос
3. Нитки мулине (для вышивания глазок и носиков)
4. Холофайбер для набивки ( либо синтепон)
Выкройка деда, бабки и внучки дана общая, нужно просто распечатать
выкройку для каждого персонажа нужного размера. Для стойкости тушки под
низ туловища я подкладываю картонный круг.
Размеры: дед –25 см, бабка –23 см, внучка –21 см.


Для Жучки, кошки и мышки размер выкройки тушки показана на листе А4 в
натуральную величину, а вот лапы 1 и 2 на выкройке предназначены только
для Жучки. Соответственно для кошки и мышки лапы нужно будет уменьшить
до подходящего размера для каждой тушки.
Размеры: Жучка –16 см, кошка –14 см, мышка-11 см, репка (с листочками) –20 см.


Выкройка хвостов и ушек показана на листе А4 в натуральную величину для каждого персонажа.
Репка состоит из 6-ти клиньев, образующих шар.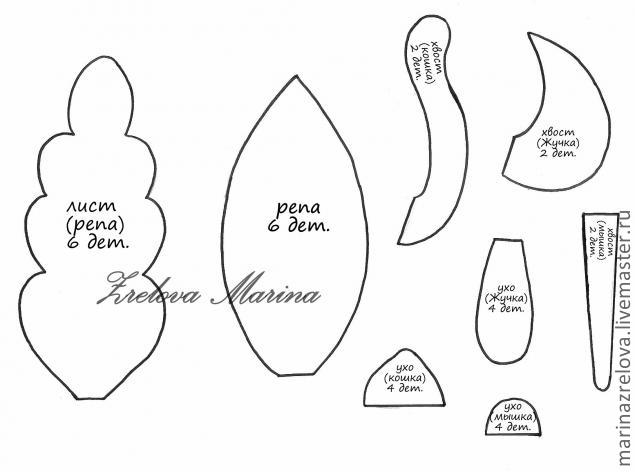
Гость- Viesis
Re: Mīkstā rotaļļieta - "How to.."
![]() by Гость 20.03.12 12:44
by Гость 20.03.12 12:44
Кукла на шарнирах - как сделать своими руками
Кукла на шарнирах. Часть 1
www.myjane.ru/articles/text/?id=200
Кукла на шарнирах. Часть 2
Во второй части мы расскажем про лепку нашей куклы, проработку деталей лица, подготовку основы для рук.
www.myjane.ru/articles/text/?id=201
Часть 3. Создание головы, туловища, рук и ног
www.myjane.ru/articles/text/?id=202
Часть 4 - окончательная сборка куклы
www.myjane.ru/articles/text/?id=203
Гость- Viesis

Гость- Viesis
Re: Mīkstā rotaļļieta - "How to.."
![]() by Enifer 07.05.12 16:22
by Enifer 07.05.12 16:22
ШКОЛА ИГРУШКИ - мастерская текстильных кукол - http://shkola-igrushki.ru/
Enifer- Foruma dvēsele
- Сообщения : 6795
Дата регистрации : 05.03.11
Откуда : Latvia, Norway -

Enifer- Foruma dvēsele
- Сообщения : 6795
Дата регистрации : 05.03.11
Откуда : Latvia, Norway -
Re: Mīkstā rotaļļieta - "How to.."
![]() by Enifer 19.05.12 11:50
by Enifer 19.05.12 11:50
- Spoiler:
- Сканы журналов, книг: http://picasaweb.google.com/dongqqqqq
Enifer- Foruma dvēsele
- Сообщения : 6795
Дата регистрации : 05.03.11
Откуда : Latvia, Norway -
Re: Mīkstā rotaļļieta - "How to.."
![]() by Enifer 19.05.12 16:02
by Enifer 19.05.12 16:02
Подробнейший учебник по изготовлению Тедди. На немецком языке,но с фото мастер-классом. Выкройки.


picasaweb.google.com/Pacz.Timea/TeddyBearKNyv#


picasaweb.google.com/Pacz.Timea/TeddyBearKNyv#
Enifer- Foruma dvēsele
- Сообщения : 6795
Дата регистрации : 05.03.11
Откуда : Latvia, Norway -


Enifer- Foruma dvēsele
- Сообщения : 6795
Дата регистрации : 05.03.11
Откуда : Latvia, Norway -

einite- Foruma dvēsele
- Сообщения : 5412
Дата регистрации : 07.03.11
Откуда : Рига
Leļļuplaukts :: SADAĻAS PA LEĻĻU VEIDIEM / РАЗДЕЛЫ ПО ВИДАМ КУКОЛ :: PAREJIE LEĻĻU IZLAIDUMI / ОСТАЛЬНЫЕ ВЫПУСКИ КУКОЛ :: Mīkstās rotaļlietas / Мягкая игрушка
Lapa 1 no 1
Permissions in this forum:
Jūs nevarat atbildēt tematos šajā forumā|
|
|